
I'm @kyleashipley.
I write code, usually in Ruby or JavaScript, and very infrequently words at this site.
You will find me at OurHealth these days as the Head of Product & Engineering. We are doing Neat Stuff™ in healthcare and are currently hiring.
Memory: A Joybox Tutorial
Earlier this year, RubyMotion had its inaugural conference, and with it came the first RubyMotion game development framework, Joybox. Joybox is a wrapper around popular iOS game development libraries Cocos2D and Box2D. Cocos2D handles sprite drawing, movement, touch events, and simple collisions, while Box2D focuses on more complex physics simulations. (Think Angry Birds.)
Looking for an excuse to play with my RubyMotion license, I decided to dive into Joybox. It's a very new framework, so there's definitely some dragons here, but creator Juan Karam and his team are actively improving it. (And it's open-source, so you can help improve it too!) There are a few official examples available, but I wanted to go a little deeper and understand how to put all the pieces together. I decided to put together a tutorial for a simple Memory game to help other beginners get started.
I'm going to assume that readers are familiar with Ruby and basic game development terminology. Let me know in the comments if I need to dive deeper on something!
If you have any questions or run into any issues with Joybox, feel free to post to the Google Group. Juan has been very responsive to questions so far, and we'd love to see more people using the framework!
The completed source for this tutorial is available here.
Prerequisites
In order to complete this tutorial, you'll need the following installed on your machine:
- XCode
- Ruby (>= 1.9)
- RubyMotion
- Joybox
If everything is installed correctly, you should be able to complete the Hello World step from the RubyMotion instructions and the Getting Started step from the Joybox instructions.
Getting Started
Let's go ahead and create a new project for our awesome Memory game:
motion create --template=joybox-ios memory_tutorial

=> Create memory_tutorial
Create memory_tutorial/app/app_delegate.rb
Create memory_tutorial/Rakefile
Create memory_tutorial/resources/Default-568h@2x.png
Create memory_tutorial/resources/fps_images-hd.png
Create memory_tutorial/resources/fps_images-ipadhd.png
Create memory_tutorial/resources/fps_images.png
Create memory_tutorial/spec/main_spec.rb
Nothing too fancy here. It creates an app_delegate, which is the entry point to an iOS app, a Rakefile for RubyMotion, a few default images, and a test stub. I'm not going to do any testing in this tutorial, but I might cover this topic in the future.
Make sure you're in good shape by running rake. If all is well, you should see the following:
![]()
Not too exciting, but it's a start!
Bundler
Because Joybox is so new, there's lots of bug fixes and improvements happening in master that don't immediately get cut into a gem. I'm going to use a few of these improvements, so let's take advantage of Bundler here. Bundler is a dependency manager for Ruby that helps you maintain some sanity in your environment.
If you don't already have it installed, take a couple minutes to familiarize yourself with it, then run:
gem install bundler
Next, we need a Gemfile with the following:
source 'https://rubygems.org

gem 'joybox', github: 'rubymotion/Joybox'
Run bundle install then rake one more time to make sure everything is in order.
app_delegate.rb
Let's take a quick look at the app_delegate file to understand what Joybox did on our behalf.
In Joybox, there is an object called the director that is responsible for controlling the game loop itself. It handles things like double-buffered drawing, pausing, resuming, and so on. The Joybox iOS template fills in our app delegate with basic handling for these cases, so we can focus on the core game logic.
There's nothing too fancy in here, so we'll keep moving.
Core Classes
There are four main classes that we'll need to familiarize ourselves with for this tutorial:
Sprite
Sprites represent most interactive objects in a game. Player characters, enemies, power-ups, bricks, and walls are all examples of things that a sprite can represent. In Joybox, sprites contain information about what to draw (the image file), where to draw it, and how to react to collisions, among other things.
In our simple memory game, we won't deal with collisions and more complex features of sprites, but know that they're available. There's a basic collisions example called Gorillas in the Joybox-Examples repository on GitHub.
The Sprite class is intended to be subclassed in Joybox. We'll see an example of how to subclass later in the tutorial.
Layer
Layers manage drawing and user interactions. Layers have two main methods: on_enter and on_exit. In on_enter, you tell Joybox which sprites to draw and how to respond to touch actions. We won't use on_exit in this tutorial because we only have one layer, but it's where you would clean up touch handlers and sprites if you needed to swap in another layer.
Like Sprite, Layer is intended to be subclassed, and we'll take advantage of that in a bit.
Scene
At a high level, scenes represent screens within your game. Examples include your start screen, menu screen, pause screen, cutscenes, level screens, and so on. A scene manages one or more layers.
Because our scenes are so simple, we're going to take advantage of a Joybox feature that lets you declare scenes implicitly like so:
class MyLayer < Joybox::Core::Layer
  scene
end
This allows us to instantiate a scene without having to create a really boring class to represent it.
Director
You might be noticing a hierarchy here. Unsurprisingly, the director manages the scenes, which manage the layers, which manage the sprites. We won't need to do much with the director in this game, but it's a nice object to have around.
Adding Our First Layer
The first thing we're going to do is add a layer. In our memory game, our layer will represent the grid of tiles that need to be matched. Let's create a new layer at app/grid_layer.rb and call it GridLayer. For now, let's just print something to make sure it works:
# app/grid_layer.rb
class GridLayer < Joybox::Core::Layer
  scene

  def on_enter
    puts "Entering GridLayer..."
  end
end
As I mentioned before, we don't need a full-fledged scene in our game, so we'll use the implicit scene functionality in GridLayer. Notice that scene is a class method, not an instance method, so we'll invoke it with GridLayer.scene.
on_enter is a special function that Joybox calls out to during layer construction. This is where we'll set up most of our sprites and touch handlers, but for now, we'll just puts.
The last thing we need to do before we rake is to push the scene when the game starts. Update your AppDelegate to look like the following:
# app/app_delegate.rb

class AppDelegate
  def application(application, didFinishLaunchingWithOptions:launchOptions)
    # …
    @window.makeKeyAndVisible

    @director.push_scene GridLayer.scene
  end
end
Run rake. You should see a blank screen still, but in the REPL that comes up when rake finishes compiling the code, you should see "Entering GridLayer…"
Holy (Sprite) Sheet!
In the Core Classes section, we talked a little bit about sprites. You can instantiate a sprite using the following code:
sprite = Sprite.new file_name: 'my_sprite.png', position: [10, 10]
This works well for small numbers of sprites. When you're dealing with lots of sprites, though, it's better to load them all into memory using a sprite sheet.
If you've done any game development before, you've probably seen sprite sheets. Here's an example from Prince of Persia:
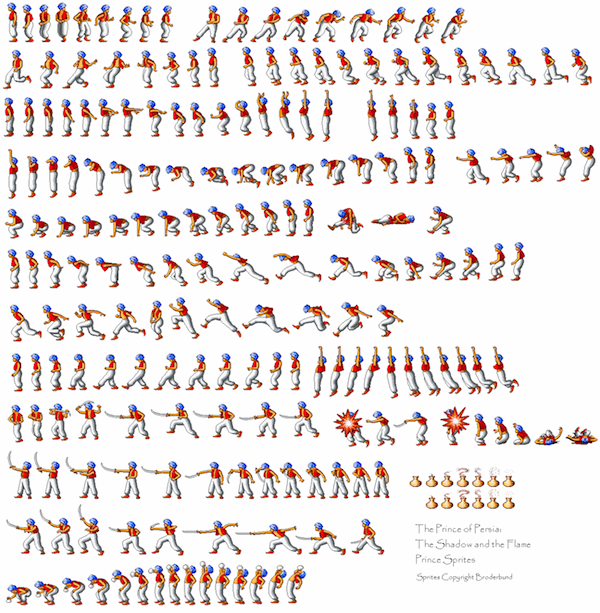
Basically, you load every frame from this sprite sheet into your game, then just tell the game which frame to draw for standing, running, jumping, fighting, and so on.
For this memory game, I decided to use danc's excellent (free!) tile set called PlanetCute. I couldn't find a great way to resize images within Joybox, which is probably a bad idea anyway, so I reformatted them to be 64x64 images using Pixelmator. I then used TexturePacker to export the sprites I wanted. TexturePacker is free if you don't need more advanced filters. I'd recommend you play with it at some point (and make a prettier alternative!), but for now, you'll just need these two files:
The .png file contains the actual sprite sheet. The .plist file is used by Cocos2d to allow you to say things like "Give me running frame #3" and know that "running frame #3" is at 100, 200 in the .png file and has a height of 50 and a width of 64. It's just a simple XML file, so take a quick look and make sure I'm a reliable narrator.
Add these two files to your /resources directory.
Can We Draw Something Yet?
Now that we have our sprite sheet, we'll need to load those frames into some Joybox objects. Remove the puts, then add the following to our GridLayer:
# grid_layer.rb
class GridLayer < Joybox::Core::Layer
  def on_enter
    SpriteFrameCache.frames.add file_name: "sprites.plist"
    @sprite_batch = SpriteBatch.new file_name: "sprites.png"
    self << @sprite_batch
  end
end
As discussed in the previous section, SpriteFrameCache tracks the location and dimension information within the sprite sheet by using the .plist file, and SpriteBatch loads the actual images into memory.
We also need to make the layer aware of our SpriteBatch object so we can draw sprites. We do this by adding our SpriteBatch as a child.
If we ran rake now, we'd still see a black screen, because we're not actually drawing a Sprite. Let's add one more line at the end of on_enter:
# grid_layer.rb
@sprite_batch << Sprite.new(frame_name: 'boy.png',
  position: [Screen.half_width, Screen.half_height])
This will look up the frame called 'boy.png' in the .plist file, find the associated image, and draw it in the middle of the screen.
Run rake. Your screen should look like the following:

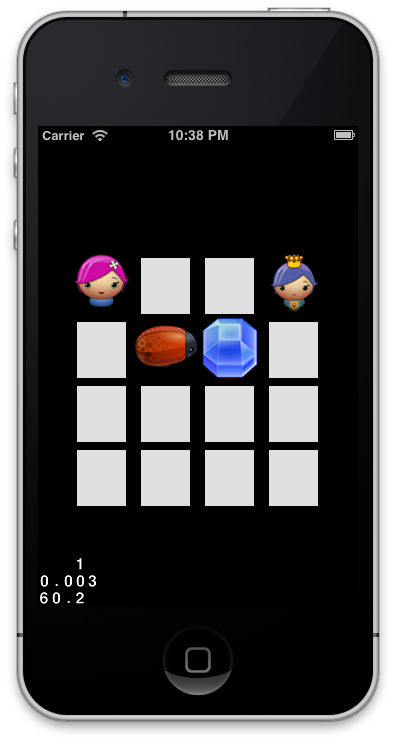
He's cute, but he's a little lonely by himself. Let's add a couple friends for him. At the end of on_enter:
# grid_layer.rb
@sprite_batch << Sprite.new(frame_name: 'girl_cat.png', position: [0, 0])
@sprite_batch << Sprite.new(frame_name: 'girl_cat.png', position: [Screen.width - 20, Screen.height - 20])
If we run rake again, we'll see:

This is a good time to explain the coordinate system in Joybox/Cocos2d. If you've done graphics work before, you might be surprised that the origin (0,0) is in the lower left, not the top left. If you have a REPL open, try entering the following commands:
(main)> Joybox::Common::Screen.width
=> 320.0
(main)> Joybox::Common::Screen.height
=> 480.0
The top right corner of the screen is 320x480 (in pixels) for a non-Retina iPhone. If you're running your simulator in Retina mode, you may see different results.
Also notice that the character is centered at the specified point. For example, we only see the top-right quadrant of our Cat Girl at [0,0].
Gridlocked
Now that we know how to draw some sprites, let's draw a grid of sprites to represent the tiles in our memory game. But first, let's do a really simple refactoring in our GridLayer. Remove all the sprite drawing calls, then create a new method called load_sprite_sheet:
# grid_layer.rb
def on_enter
  load_sprite_sheet
end

def load_sprite_sheet
  SpriteFrameCache.frames.add file_name: "sprites.plist"
  @sprite_batch = SpriteBatch.new file_name: "sprites.png"
  self << @sprite_batch
end
on_enter is going to get bigger, so it makes sense to tidy it up a bit now.
Next, let's draw a simple 4x4 grid of empty tiles. There's a sprite frame called hidden.png in our sprite sheet that we can use to represent an unflipped tile:
# grid_layer.rb
def on_enter
  load_sprite_sheet
  load_tiles
end

def load_tiles
  @tiles = 4.times.map do |row|
    4.times.map do |column|
      Sprite.new frame_name: 'hidden.png', position: [
        column * 64 + 64,
        row * 64 + 128
      ]
    end
  end.flatten

  @tiles.each { |t| @sprite_batch << t }
end
load_tiles is a little tricky, so let's walk through it. Basically, we want to create 4 rows and 4 columns. Ruby's Fixnum class has a handy times method that does exactly what you would think. In the REPL:
(main)> 4.times { puts 'hello' }
hello
hello
hello
hello
=> 4
(Notice that it returns the original Fixnum, although that won't cause us any trouble here.)
We can chain Ruby's map operator to collect the results of each trip into the block:
(main)> 4.times.map { 'hello' }
=> ["hello", "hello", "hello", "hello"]
Again, no surprises.
One other trick we can use is the fact that times passes a counter into its block:
(main)> 4.times.map { |i| i }
=> [0, 1, 2, 3]
Now we have all the building blocks we need to make the method above:
(main)> 4.times.map do |row|
(main)>   4.times.map do |column|
(main)>     "#{row} #{column}"
(main)>   end
(main)> end
=> [["0 0", "0 1", "0 2", "0 3"],
    ["1 0", "1 1", "1 2", "1 3"],
    ["2 0", "2 1", "2 2", "2 3"],
    ["3 0", "3 1", "3 2", "3 3"]]
Notice that we have an array of arrays. We could work with the structure that way, but it'll be a little easier if we flatten it out:
(main)> 4.times.map do |row|
(main)>   4.times.map do |column|
(main)>     "#{row} #{column}"
(main)>   end
(main)> end.flatten
=> ["0 0", "0 1", "0 2", "0 3",
    "1 0", "1 1", "1 2", "1 3",
    "2 0", "2 1", "2 2", "2 3",
    "3 0", "3 1", "3 2", "3 3"]
Perfect!
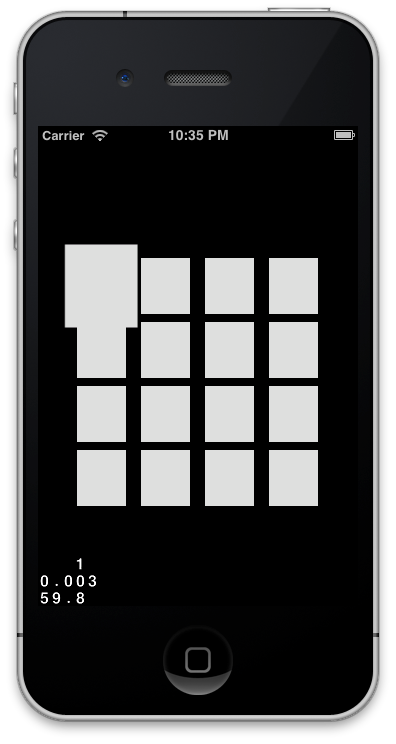
Run rake again, and you should see the following screen:
![]()
Before we move on, let's do a little bit of cleanup. You might have noticed a couple magic numbers above (64 and 128). Our tiles are 64x64, so the row * 64 and column * 64 is probably referring to the size of each tile. Let's add a constant called TILE_SIZE and set it to 64.
Similarly, the 64 and 128 that we're adding represent the distance from the left and bottom of the screen, so let's call those LEFT_GUTTER and BOTTOM_GUTTER.
# grid_layer.rb
class GridLayer < Joybox::Core::Layer

  TILE_SIZE = 64
  LEFT_GUTTER = 64
  BOTTOM_GUTTER = 128

  def load_tiles
    @tiles = 4.times.map do |row|
      4.times.map do |column|
        Sprite.new frame_name: 'hidden.png', position: [
          column * TILE_SIZE + LEFT_GUTTER,
          row * TILE_SIZE + BOTTOM_GUTTER
        ]
      end
    end.flatten

    @tiles.each { |t| @sprite_batch << t }
  end
end
Run rake one more time to make sure we didn't break anything. If it looks good, let's make our Tiles a little more interesting.
Let's Get Touchy/Feely
Right now, our "Tiles" are actually just sprites. Eventually, we want to do things like give each tile a different image, flip tiles between hidden and showing, freeze tiles that have been matched, and so on.
Let's go ahead and create a Tile class. It'll be pretty simple to start, but we'll build it up as we go. We'll need to make some changes to GridLayer as well:
# tile.rb
class Tile < Joybox::Core::Sprite
  def initialize(opts={})
    super frame_name: 'hidden.png', position: opts[:position]
  end
end

# grid_layer.rb
def load_tiles
  @tiles = 4.times.map do |row|
    4.times.map do |column|
    Tile.new position: [
        column * TILE_SIZE + LEFT_GUTTER,
        row * TILE_SIZE + BOTTOM_GUTTER
    ]
    end
  end.flatten

  @tiles.each { |t| @sprite_batch << t }
end
Before we rake again, let's go ahead and put some basic touch handling in place. Right now, we'll just print out the location of the touches to make sure it's working:
# grid_layer.rb
def on_enter
  # …
  handle_touches
end

def handle_touches
  on_touches_ended do |touches, event|
    touch = touches.any_object
    puts [touch.location.x, touch.location.y].inspect
  end
end
In our simple memory game, we don't need to worry about dragging or multitouch, so we only need to handle the on_touches_ended callback. There are also callbacks for on_touches_began, on_touches_moved, and on_touches_cancelled that you can use for more complex games.
on_touches_ended provides an array of touch objects. If we needed multitouch, we could process all of the objects in this array. Since we only care about single touch, we'll go ahead and use the touches.any_object.
Run rake again, and try clicking around on the screen. You should see some x and y positions being logged. If you click and drag, you'll notice that the event isn't logged until you release. This is because we're handling on_touches_ended, which only fires when the tap is completed (like mouseup/keyup events in web programming).
In order to flip a tile, we'll need to take these touch location coordinates and figure out which tile was tapped. Let's go ahead and add that logic now. First, let's write a method on Tile that tells us whether a given touch location is inside of it. A naive solution would be:
# tile.rb
def touched?(touch_location)
  touch_location.x > boundingBox.origin.x &&
  touch_location.x < (boundingBox.origin.x + boundingBox.size.width) &&
  touch_location.y > boundingBox.origin.y &&
  touch_location.y < (boundingBox.origin.y + boundingBox.size.height)
end
This will work, but it's a little verbose, and probably not ideal. There's some built-in Cocos2d concepts (with light Ruby wrapping) we can take advantage of here:
# tile.rb
def touched?(touch_location)
  rect = CGRect.new(boundingBox.origin, boundingBox.size)
  CGRectContainsPoint(rect, touch_location)
end
CGRectContainsPoint is more performant and saves us a bit of code, so we'll take advantage of it.
Now we just need to add a call out to touched? in the GridLayer:
# grid_layer.rb
def handle_touches
  on_touches_ended do |touches, event|
    touch = touches.any_object
    if tile = tile_to_flip(touch.location)
      puts 'flipping!'
    end
  end
end

def tile_to_flip(touch_location)
  @tiles.detect { |t| t.touched?(touch_location) }
end
Run rake again and click around. You should be able to tell which tile is about to get flipped.
Flip it! Flip it good!
All this plumbing is about to pay off for us! Printing console messages is nice, but we're making a game, so we should have some sweet animations when the tile gets touched!
But this is just a tutorial, so I didn't have time to invest in sweet animations. We're going to use some of the built-in Joybox animations instead. It won't be a real flip, but it'll be good enough to impress at least one our your friends.
Let's add a simple flip method to our Tile class and call that instead of printing coordinates in our GridLayer.:
# tile.rb
def flip
  run_action Sequence.with(actions: [
    Scale.to(scale: 1.5, duration: 0.2),
    Scale.to(scale: 1.0, duration: 0.2)
  ])
end

# grid_layer.rb
def handle_touches
  # …
  if tile = tile_to_flip(touch.location)
    tile.flip
  end
end
Run rake and try tapping on your tiles. You should see them scale up to 150% of their size over 0.2 seconds, then shrink back to normal.
Notice that Scale is absolute, not relative, as in the following example:
# double the original size
Scale.to(scale: 2.0)

# will end up half of the original size!
Scale.to(scale: 0.5)
Our flip animation is a start, but we actually need to change the image that's showing. Memory is boring if everything is a match! Let's add some TYPES to our Tile class. We'll just make them correspond to the sprites in our sprite sheet for simplicity:
# tile.rb
class Tile
  TYPES = %w(
    boy gem_blue gem_green gem_orange girl_cat girl_horn
    girl_pink girl_princess heart key ladybug star
  )
end
In case you don't remember every % construct in Ruby, %w creates an array of strings:
(main)> %w(foo bar baz)
=> ["foo", "bar", "baz"]
Let's go ahead and allow a :type parameter to be passed into our Tile constructor:
# tile.rb
def initialize(opts={})
  super frame_name: 'hidden.png', position: opts[:position]

  @type = opts[:type]
end
This will let us figure out which image needs to be drawn when the time comes.
Next, let's update our GridLayer to pick 8 pairs of tiles that can be matched (4x4 = 16 = 8 pairs). I'm going to use a bit of Ruby cleverness here, but I think it expresses the solution well.
First, let's pick 8 random tile types:
8.times.map { Tile::TYPES.sample }
In Ruby 1.9+, Array#sample returns a random element from the array. We want to do it 8 times and collect them into a new array, so we use times.map.
Once we've done that, we want to create pairs of tiles:
types = 8.times.map { Tile::TYPES.sample } * 2
In Ruby, if you multiply an Array by a number n, it creates a new array with each element appearing n times. So:
(main)> [1,2,3] * 2
=> [1, 2, 3, 1, 2, 3]
In our case, we'll end up with something like:
(main)> types = 8.times.map { Tile::TYPES.sample } * 2
=> ["star", "girl_pink", "star", "gem_blue",
    "star", "boy", "key", "girl_cat",
    "star", "girl_pink", "star", "gem_blue",
    "star", "boy", "key", "girl_cat"]
(Notice that I grouped them in fours. These correspond directly to the tiles in our game!)
Let's make sure we pass a type to each Tile as we construct it. We can use Array#shift to make it easy on ourselves:
# grid_layer.rb
def load_tiles
  types = 8.times.map { Tile::TYPES.sample } * 2

  @tiles = 4.times.map do |row|
    4.times.map do |column|
      Tile.new type: types.shift, position: [
        column * TILE_SIZE + LEFT_GUTTER,
        row * TILE_SIZE + BOTTOM_GUTTER
      ]
    end
  end.flatten

  @tiles.each { |t| @sprite_batch << t }
end
The last step here is to use the Tile's type to change which image is showing during the flip:
# tile.rb
def flip
  setDisplayFrame SpriteFrameCache.frames["#{@type}.png"]

  # our sweet animation
end
Go ahead and run rake again. We can actually flip our tiles over now!
Well, that about wraps it up. Now, we'll just…
Wait a minute. The tiles stay flipped even when they don't match. That's not much of a memory game. Let's fix that.
"Why must you analyze everything with your relentless logic?"
We need to add the matching logic in at this point. We need to track up to two active_tiles. Once two tiles are selected, we'll see if they're the same type of tile. If so, we want to "freeze" them so they can't be flipped back over or used in another match. If not, we flip them back over and try again.
Let's deal with our Tile first. For starters, let's add the ability to flip a Tile back over. If the current frame is "hidden.png", we want to switch it to the Tile's type. Otherwise, we want to switch it back to "hidden.png".
# tile.rb
def flip
  if isFrameDisplayed(SpriteFrameCache.frames["hidden.png"])
    setDisplayFrame(SpriteFrameCache.frames["#{@type}.png"])
  else
    setDisplayFrame(SpriteFrameCache.frames["hidden.png"])
  end

  # world's sexiest animation
end
Go ahead and rake. You should be able to flip tiles back over now. But boy is that code ugly! Let's clean it up a little bit with two helper methods:
# tile.rb
def flip
  if is_showing?("hidden.png")
    show "#{@type}.png"
  else
    show "hidden.png"
  end
end

def show(frame_name)
  setDisplayFrame SpriteFrameCache.frames[frame_name]
end

def is_showing?(frame_name)
  isFrameDisplayed SpriteFrameCache.frames[frame_name]
end
Much better.
The logic for tracking active tiles is a bit tricky, so let's take it step by step. Let's just add a simple array to our GridLayer:
# grid_layer.rb
def handle_touches
  @active_tiles = [] # HERE

  on_touches_ended do |touches, event|
    touch = touches.any_object
    if tile = tile_to_flip(touch.location)
      tile.flip
    end
  end
end
We only want to allow 2 tiles to be flipped at a time, so let's break if there are already 2 @active_tiles:
# grid_layer.rb
def handle_touches
  @active_tiles = []

  on_touches_ended do |touches, event|
    break if @active_tiles.size == 2 # HERE

    touch = touches.any_object
    if tile = tile_to_flip(touch.location)
      tile.flip
    end
  end
end
Next, let's add the currently selected tile to @active_tiles when it gets flipped:
# grid_layer.rb
def handle_touches
  @active_tiles = []

  on_touches_ended do |touches, event|
    break if @active_tiles.size == 2

    touch = touches.any_object
    if tile = tile_to_flip(touch.location)
      tile.flip

      @active_tiles << tile # HERE
    end
  end
end
If we have 2 @active_tiles, we want to compare them. If they're the same, they get frozen. If they're different, they get flipped back over:
# grid_layer.rb
def handle_touches
  @active_tiles = []

  on_touches_ended do |touches, event|
    break if @active_tiles.size == 2

    touch = touches.any_object
    if tile = tile_to_flip(touch.location)
      tile.flip

      @active_tiles << tile

      # HERE
      if @active_tiles.size == 2
        # Tiles are the same type -- match!
        if @active_tiles.map(&:type).uniq.size == 1
          puts "Freeze"
        else
          puts "Flip back"
        end
        @active_tiles = []
      end
    end
  end
end
Add a quick attr_reader :type to your Tile class, then run rake. You should get some feedback on whether two tiles are a match when you tap them.
Let's go ahead and hook up the "Freeze" and "Flip back". It's pretty simple:
# grid_layer.rb
def handle_touches
  @active_tiles = []

  on_touches_ended do |touches, event|
    break if @active_tiles.size == 2

    touch = touches.any_object
    if tile = tile_to_flip(touch.location)
      tile.flip

      @active_tiles << tile

      if @active_tiles.size == 2
        if @active_tiles.map(&:type).uniq.size == 1
          @active_tiles.each(&:freeze) # HERE
        else
          @active_tiles.each(&:flip) # AND HERE
        end
        @active_tiles = []
      end
    end
  end
end
Right now, there's no Tile#freeze method. Let's take care of that:
# tile.rb
def freeze
  @frozen = true
end
That's all well and good, but we probably want to do something with that flag. Let's ignore touches on frozen tiles:
# tile.rb
def touched?
  return if @frozen

  # …
end
If you run rake and click around, you'll see the behavior is a little strange. If the tiles match, they stay frozen as expected. If they don't match, though, you don't even get to see the second tile! That's not a very fun game, and definitely doesn't improve your memory. To fix it, we'll need to add a short delay before we freeze or flip the tiles. We can do that using the Joybox actions Delay and Callback. Our handle_touches function is getting a little long anyway, so let's split the logic for freezing and flipping out into its own callback function:
# grid_layer.rb
# grid_layer.rb
def handle_touches
  @active_tiles = []

  on_touches_ended do |touches, event|
    break if @active_tiles.size == 2

    touch = touches.any_object
    if tile = tile_to_flip(touch.location)
      tile.flip

      @active_tiles << tile

      if @active_tiles.size == 2
        self.runAction Sequence.with(actions: [
          Delay.time(by: 1),
          Callback.with(&handle_active_tiles)
        ])
      end
    end
  end
end

def handle_active_tiles
  Proc.new do
    if @active_tiles.map { |t| t.type }.uniq.size == 1
      @active_tiles.each(&:freeze)
    else
      @active_tiles.each(&:flip)
    end
    @active_tiles = []
  end
end
The only real trick here is that Callback.with expects a block, so we need handle_active_tiles (our callback function) to return a Proc object. We then use & to pass that Proc in the block position instead of as an argument to the Callback.with function. If that's too confusing, feel free to use Callback.with more naturally:
# alternative to above
Callback.with do
  if @active_tiles.map { |t| t.type }.uniq.size == 1
    @active_tiles.each(&:freeze)
  else
    @active_tiles.each(&:flip)
  end
  @active_tiles = []
end
Take a deep breath, run rake again, and play your game. If everything went well, matched tiles should stay matched, unmatched tiles should get flipped back over, and you should be limited to two selections at a time -- just like you would expect!
#Winning
Your game is completely playable except for one thing: it doesn't tell you when you win. That's pretty lame, so let's add a win screen. It won't take long, then you can make all your friends relive their childhoods by playing your awesome memory game.
We'll need a new Scene (and Layer) to represent winning the game. It's going to be really simple: just the words "You Win!" in big letters in the middle of the screen. It's been a while since we've created a Layer, but it's pretty straightforward:
# app/win_layer.rb
class WinLayer < Joybox::Core::Layer
  scene

  def on_enter
    title = Label.new text: "You Win!", font_size: 48,
    position: [Screen.half_width, Screen.half_height + 50]
    self << title
  end
end
We'll also need to identify the victory condition so we can display this Scene. In our case, the victory condition occurs when all tiles are frozen. We can check for that after we freeze any given pair of tiles. We'll also add a helper function to make it read a little more naturally:
# grid_layer.rb
def handle_active_tiles
  Proc.new do
    if @active_tiles.map { |t| t.type }.uniq.size == 1
      @active_tiles.each(&:freeze)
      if all_matched?
        Joybox.director.replace_scene WinLayer.scene
      end
    else
      @active_tiles.each(&:flip)
    end
    @active_tiles = []
  end
end

def all_matched?
  @tiles.all?(&:frozen)
end
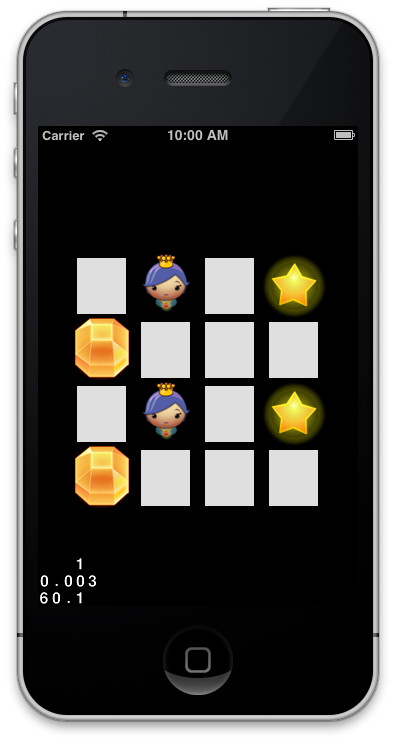
Add an attr_reader :frozen to your Tile class, then give it a rake. Play through your game until you win, then enjoy your victory:
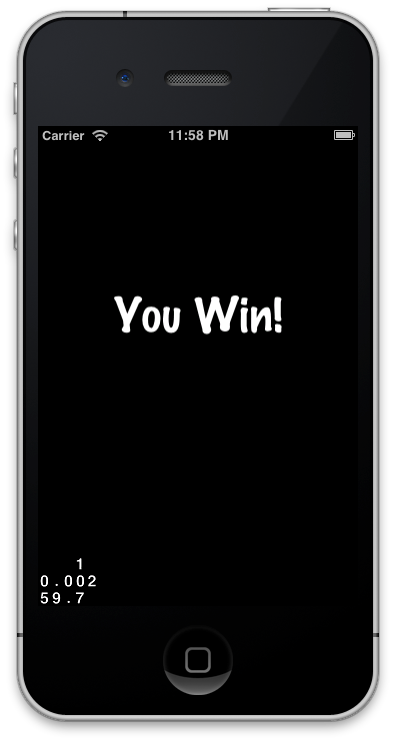
Yes, you certainly do.
Wrapping up
I hope you've enjoyed this whirlwind tour through Joybox. There's obviously lots more inside, and many more kinds of games you can make. I just made a handful of grid-based games and thought I'd share some of the stumbling blocks I ran across, as well as some of the ways to handle game logic as your game becomes more advanced.
There are many ways you could grow this tutorial: adding more rows/columns, keeping track of the number of moves, adding a timer, and so on. Feel free to share your hacks and extensions back to the Joybox Google Group or to me directly.
I'm looking forward to seeing some cool games built with Joybox. Happy coding!
You can find me on Twitter if you have any feedback.